If you’ve never heard of what3words, it’s a proprietary mapping service that split the world into a 3 meter square grid. The identifier for each square on the map isn’t a string of numbers, it’s a set of three words. Unlike GPS coordinates which use a string of numbers to indicate latitude and longitude, a combination of three words is far easier to remember and communicate. You can either choose to install the free application or type in the address (linked above) in your browser.
This innovative method of viewing and communicating map coordinates has saved lives. When someone is lost or injured in the woods or some other remote location, providing they have access to a phone with a signal, their exact location can be communicated to a rescue team. For those who are more likely to end up in situations without cell signals, there are GPS devices on the market that can send an SOS. That’s a topic for a different day, and probably a completely different… genre? Getting lost on the trail doesn’t exactly pertain to native gardening, even if the two may overlap when it comes to locating plants in the wild.
Most of the time, what3words is utilized by shipping companies. People who live in remote areas know the struggle of getting their packages delivered. Even with a postal address and clear instructions, delivery drivers somehow manage to get lost. Using this service, recipients are able to point them to an exact location on the map.
Let’s practice using the map
I have a few locations for you to try out so you can become familiar with how this works. I’ll even provide photos for them, if you decide to test this out in person.
///scandal.diver.doctor
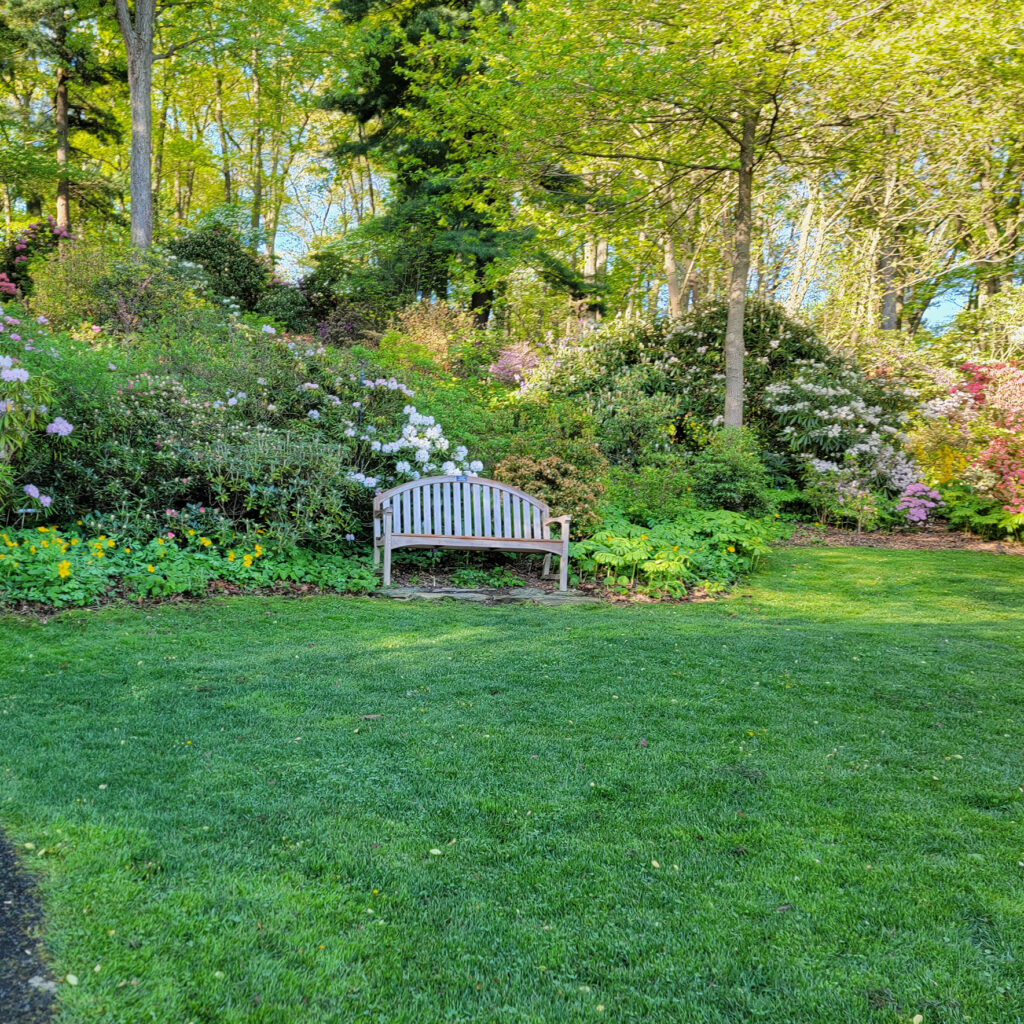
The first location is my favorite bench at Jenkins Arboretum, which gives the best view of the pond. Sometimes while working in this location, we’d sit down for a quick snack break before getting back to what we were doing. I’ve even gotten a few great photos while sitting on this bench for my break.
The location is ///scandal.diver.doctor – all you need to do is type those words in, periods instead of spaces, and no need for the forward slashes. It’s not my only favorite bench – the other sits under the dogwood on Azalea Hill among the Holly Springs collection. Actually they have some great benches spread throughout, but this is arguably the best view.
Maybe, but it helps me to remember where they are located.
///defeat.camping.shelving
If you’re still at Jenkins, there is a nice, large patch of Opuntia across the way from this bench if you head down the path around the pond to the left. The address for the Opuntia is ///defeat.camping.shelving. If you look closely, there is some Paxistima canbyi growing among the patch, a few feet from the edge of the bed. They’re slow-growing species so they’re still quite small.

///cloak.moving.boot
If you’re further east of Philly and Jenkins is too far of a hike, there’s another free and publicly open native garden you can visit. For this one you’d want to go to ///cloak.moving.boot. This is the Twining native garden where I’ve volunteered occasionally to help with things like planting and maintenance, managed by the WNF&GA-Keystone Ambler branch.
///vine.pull.fairly
There is one more spot very close to here, if you’re free on May 18th, 2025 and have some money to spend on native plants. WNF&GA is scheduled to hold their annual native plant sale next to the garden around noon that day. I’d be there regardless, but since I’m in charge of it this year, you’ll stop by, ok? Make sure you save the location ///vine.pull.fairly so you know exactly where to go for the sale.
That was fun, but what does this have to do with mapping my garden?
If you go to your home address in the map, you’ll notice something really cool. Not only are your property lines marked clearly on the map, but your property is also split up into a 3 meter square grid. Just like all these other places, you have a set of three words for each square on your property. I wouldn’t use this to install a fence – you’d still want to have someone come out and mark your property line if it isn’t marked. However, for the purpose of helping you map out your garden, this is perfect.
Save images of your map to use
Depending on the size of your property and how far you want to zoom in, you’ll want to take one to several screenshots of the map with the grid and save them. You can then print them if you like, or alter them digitally, but you are going to write on these in some way. You can switch between the different map types in the hamburger menu. Google maps gives you the property lines. I didn’t find the others to be as useful for my purposes. If you have a lot of elevation change, you’d also want to save images of the Esri map. This is a topo map, so you can line up your property map with the elevation changes.
Mark the features on your map
Now it’s time to head outside with your phone or other internet-connected device. Either with your map in hand or a notepad, go to the locations on your property that you want to mark. Any hardscaping that isn’t visible on the original? Get the what3words coordinates for those. Structures like gazebos, pergolas, trellises and arbors? Favorite trees? Water features? You can even indicate any permanently placed birdboxes. Children’s playscapes (swingset, treehouse, playhouse, etc.). Don’t forget to indicate where your veggie garden, food forest or orchard are located if you have them. You can even mark out your driveway and walkways.
Don’t forget your site conditions!
For this part of the design you may wish to consider using vellum, mylar, or tracing paper of some sort. Be sure to staple it to your printed map, or mark it with some permanent feature on your property so you can line up the layers. You will want to decide how detailed you want this to be, but you can keep it simple for now and get more information later. If you are doing this digitally, use a software that allows you to save layers that can be switched on and off
To start you can label one of your overlays as soil moisture. Another can be soil texture. You may choose to do one overlay for the mid-summer lighting conditions (peak growing season) or you may opt to do a separate overlay for each of the seasons. You could even get as detailed as creating separate overlays per month for the sun as well as the soil moisture. If you have a vernal pool, vernal creek or seasonally inundated and ponded locations, make sure you include this in an overlay. If some parts of the garden get extremly dry mid-summer, mark those too.
The fun part – designing your garden on your map
Since we’re here, we might as well go over how to design your garden! You’ve collected all the information you need, and probably far more than most people ever do. You even have a map to go with it. Start prepping your sites now. Once my shop is live, you’ll be able to select the right plant for the right place using the shop filters.
If you’re a data-minded person, you can likely plan out your garden indoors. You know what you’re working with, all you need to do is figure out which plants would work in that location. One popular method for designing a garden involves matrix design, which is done on a grid. Since you already have a grid from mapping your property, all you need to do is decide how to lay out the matrix. I will cover it in more detail in a future post, but Roy Diblik is a great source for information to get started. Lots of videos on matrix design are longer form lectures that get fairly complicated, but don’t get stuck overthinking it. It’s a garden, not hardscaping – you can change things you don’t like.
Look through the eyes of a designer.
If you’re a visual person with a good spatial awareness, you can do this on site. Bring your map with you and your internet connected device. Walk the property and visualize where you want the beds to go. You’ll want to walk around the imaginary beds to get a sense of moving through space. As you are walking, imagine the height and structure of the plants you are passing. How tall should they be? If you stand and look at the space, do you want to frame something behind it from that angle? This would involve creating a windowed effect with the plants you use.
Matrix design and a more intuitive/visual design can be mixed together. You may start with something more visual, your “statement plants” – the ones that create structure in your garden. When deciding on your ground-level filler plants, you can switch to utilizing a matrix.
This sounds just like designing a traditional horticultural garden. I thought this was about native plants!
Learning how to site plan and design a garden has nothing to do with which plants you choose. And native gardens can look like anything from a seemingly chaotic meadow to a design that is more orderly and intentional. The vast majority of information pertaining to native gardens seems split between planting prairie meadows and how to handle shade. I can see why people assume that a native garden has to look a certain way and only uses certain plants. In reality, there are dozens of different types of habitats, each with their own look and feel. A sunny meadow or a shady forest are just two, very generic types.
If you’re designing for ecology, the insects don’t really mind if you try to make it look more orderly. There are really two key parts – planting several of the same species grouped together (ideally genetically diverse), and planting a lot of diversity (many different species). Don’t worry about planting them right on top of each other – they do this in the wild. If you can squeeze another species in somewhere, that will add value to the garden. Other than that, make it look how you want. The garden should be enjoyable to everyone who uses it, including you.